
While there are large fuel generators that can power the entire house easily, with an off-grid solar system, homeowners can protect the environment while making themselves independent and unaffected by rising electricity prices. Thanks to the rise in electricity tariffs worldwide, many homeowners are focusing on self-consumption.
Those who produce solar power themselves can significantly reduce their electricity costs in the long term. By using modern solar storage systems and intelligent energy management, up to 80 percent of self-consumption can be covered. But can a solar generator power a house? Yes, it can. But it depends on your needs, your budget, and how the system is installed.
The power of a solar panel is expressed in watt peak (Wp) or kilowatt peak (kWp) Trusted Source Nominal power (photovoltaic) - Wikipedia The nominal power is the nameplate capacity of photovoltaic (PV) devices, such as solar cells, modules and systems, and is determined by measuring the electric current and voltage in a circuit, while varying the resistance under precisely defined conditions. The nominal power is important for designing an installation in order to correctly dimension its cabling and converters. en.wikipedia.org . It generally measures 1.61m², and its power is about 300 Watts-Peak or 0.3 kWp. The “peak” power of a solar panel corresponds to the maximum electrical production power that it can deliver. This is the ideal power supplied under optimal conditions:
In other words, when the sun radiates, a square meter of panel produces 1,380 watts in optimal temperature conditions. The value is what is referred to as the Solar Constant Trusted Source Solar Radiation Solar radiation is measured atop the meteorological mast at the shore laboratory using an Eppley Model PSP (Precision Spectral Pyranometer). Approximately 99% of solar, or short-wave, radiation at the earth’s surface is contained in the region from 0.3 to 3.0 µm, which corresponds to wavelength between the ultraviolet and near infrared. Above the earth’s atmosphere, solar radiation has an intensity of approximately 1380 watts per square meter (W/m2). This value is known as the Solar Constant. www.whoi.edu .
Things happen a little differently in the real world – the gray clouds that cover the sun and the -5°C in winter determine the solar power output. Therefore, the peak power makes it possible to get an idea of the potential of a solar panel but not exactly of its real production power. So how do you calculate the real power?
First, it is advisable to call on a certified PV installer to help you estimate the power of your photovoltaic cells in real conditions (and not in a laboratory as for the “peak power”). If, however, you want to play the calculator, you will have to reconsider and compare the following three factors:
In general, be aware that the effective power of a solar panel is lower than that achieved under ideal conditions of “peak” power.
A 300-watt solar module has an area of around 1.6m². If we take the 20kWh / m² per month (annual average), our 300-watt module will generate 32kWh per month and 384 kWh per year.
Deduct 25% from the yield, as no solar tracking is used. This leaves 288 kWh / year.
We could now use this to calculate the electricity price that we would save compared to the grid electricity provider. However, if we do not use the electricity directly but instead store it in batteries, losses must be taken into account.
Part of the electricity generated is also lost through long cables and the inverter. So if we calculate with a 30% loss, 202 kWh remain, which was generated by a 300-watt solar module in one year.
Now we could save around 60 dollars per year with this one module if the network provider estimates 30 cents per kWh. After 3 years at the latest, the costs of the module would be cleared.
If we include the other required equipment, the entire system would have amortized itself within 10 years and generate a positive return.
So that the system pays for itself even faster, several modules should, of course, be used as required. Since solar modules are cheap and battery storage is expensive, we should use electricity during the day if possible.
The calculation above shows very well how much a single module can do. In addition to the correct alignment, we are, of course, also dependent on the weather, and the modules must also be kept clean.
Today it is no longer worthwhile to feed as much electricity into the grid as possible. The system should therefore be dimensioned as required.
As a simple rule of thumb, the following can apply here: For every 1,000-kilowatt-hours of annual consumption, the photovoltaic system should have a nominal output of one kilowatt.
The rule of thumb for the design of the electricity storage system is similarly simple: the storage system should have a capacity of one-kilowatt hour per kilowatt of the nominal power of the PV system.
The figures are clear: the feed-in tariff (FiT) for solar power from private roof systems is usually around 10 to 20 cents per kilowatt-hour. In contrast, the price of electricity for private households is around 10 to 30 cents in the US. In Germany, UK, and Australia, the rate is 37, 26, and 23 cents per kilowatt-hour.
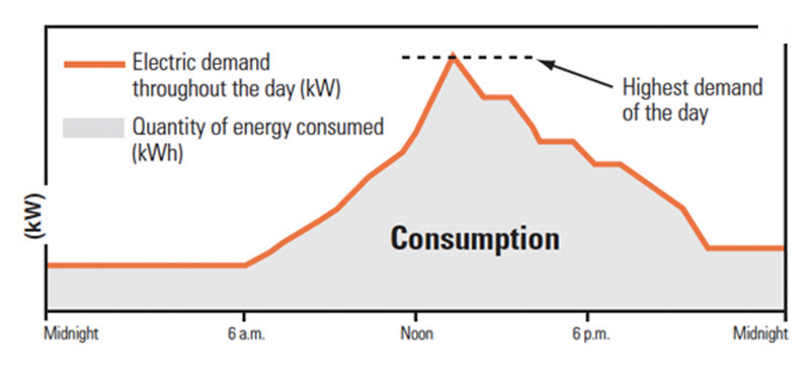
Most electricity is generated at noon, but electricity consumption is particularly high in the evening. Given the above figures, it is no longer advisable to feed the electricity into the grid at noon and buy it back in the evening at a price that is more than twice as high. There are two ways out.
One way out is to shift the electricity consumption in the family home to midday. This can be done via an intelligent control of electrical appliances, which are switched on automatically when a particularly large amount of electricity is being produced.
Unfortunately, it is no coincidence that the washing machine is always cited as an example in this context – it is not easy to find other examples. The idea of using electricity at lunchtime to heat water for heating and hot water seems more convincing.
The heat generated at noon can easily be stored in a buffer tank until the evening. The solution to store electricity at noon and use it in the evening is much more flexible.
From a technical point of view, it is no longer a problem to store the amount of electricity generated during the day by a typical roof-top system. In view of the sharp drop in prices for electricity storage systems in recent years, storage systems are now worthwhile for almost all photovoltaic systems in single-family homes.
Complete off-grid solar systems are sold online or in solar equipment stores. One of the best types of whole-house solar generators is the Nature’s Generator Elite Gold Solar Generator. It’s a 7000/3600 Watts system that comes with the kit needed. But you can also decide to install the system by yourself.
Building an off-grid system is best done by an installer. However, you can also install it successfully by following the tutorial below.
In the installation steps, we have made a general index for you. We have collected neatly and hopefully as clearly as possible the steps necessary for the construction of a complete DIY photovoltaic system.
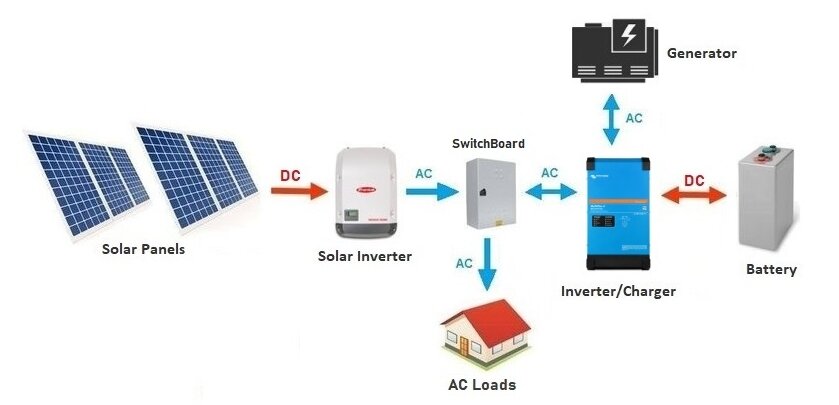
Here is a list of all the equipment needed for a functioning off-grid solar system:
Meanwhile, if you’re not convinced about your acquisition skills and want a complete kit instead, there are complete off-grid solar power station kits sold online. The Seasun 120V/240V split phase solar energy storage system is complete and powerful to give you a completely independent and off-grid experience.
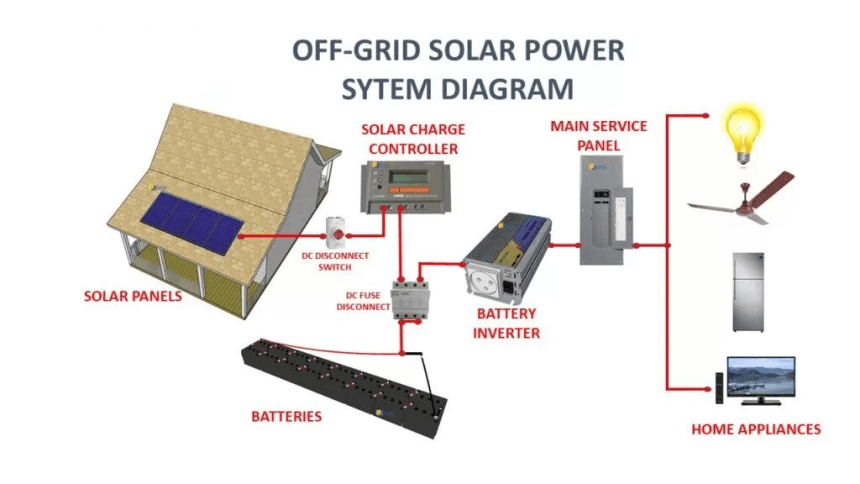
Below, we will show you a simple scheme of the DIY photovoltaic system that we will build together. It consists of 4 fundamental elements: the photovoltaic panel, the charge controller, battery, and the inverter.
For the construction of the frame for holding the panels, different types of materials are used. These include plastic, wood, iron, etc.
But the material that is the best for the construction of a good frame is aluminum conduits.
The channels can be found in any hardware store. Conduits have the following advantages: inexpensive, easy to cut, and hugely robust.
Cut the four frames of the panel with a hacksaw. We recommend that you file the cut edges and check that the frames you have just created are all 100cm or 50cm long.
To properly weld the solar cells together, first wear latex gloves to avoid leaving unsightly fingerprints on the cells! Weld the aluminum wire on each cell first in the “blue face” of the cell.
After you have welded the aluminum wires on all your cells, you will move on to weld the cells together. Ensure you’re using a 60-watt soldering iron.
The cells will be connected in series with each other to give a voltage of 12 volts. The cells must be connected like a snake, starting from the “string” at the bottom left, it goes down, and the outgoing wires at the bottom must be connected with the first cell at the bottom of the central string, and so going up the first cell at the top central must be connected with the first cell of the last string at the top.
Weld two aluminum wires on the outgoing fins on one side of the box and the other side of the solar cells; in this way, you will have connected all the cells in series.
Every solar panel needs to have a Schottky diode connected in series at the output. During the night hours or when the sun is set, this diode acts as a switch to disconnect the panel from the battery. Otherwise, the package batteries would discharge on the panel cells.
You can buy a box with 15 Amp Schottky diodes. For your panel, you will only need one.
The diode works best at high temperatures, so we recommend that you solder it to the cable inside the box as the temperature will certainly be higher inside the panel.
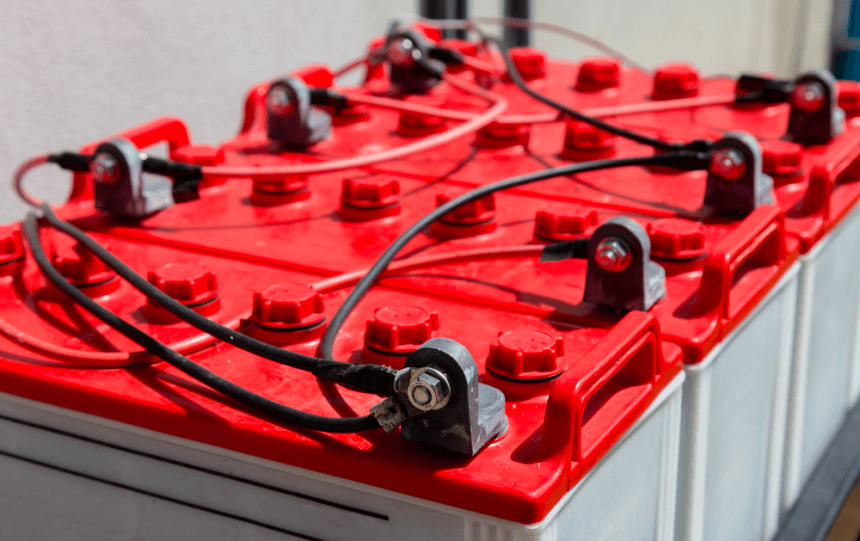
The battery has the simple purpose of accumulating all the current produced by the photovoltaic panels and then making it available during the moments when neither the sun nor the wind is present to power our devices.
The battery is the most critical element in an off-grid photovoltaic system, and it is necessary to be very careful in its choice. There are various types of batteries to choose from. These include AGM, lead-acid, and gel batteries.
After choosing, you have to parallel the batteries. You can connect the batteries in series, in parallel, or parallel and series.
The output voltage from the solar panel is not always regular and can also be high. For this reason, a charge controller is required.
The regulator usually has three connections. The first is the entry of the cables coming from the photovoltaic (some have the design of a sun). The second is the output towards the battery. The third is the output to the load in 12/24/48 volt direct current.
The charge controller is inserted between the solar panel and the battery and is essential in photovoltaic systems with storage.
Its main function is to regulate the current produced by the photovoltaic panel and keep it constant and avoid overloads.
The controller will stop sending an electrical current to the battery once it is charged or will cut off the load connected to the light bulb symbol if the battery is in deep discharge.
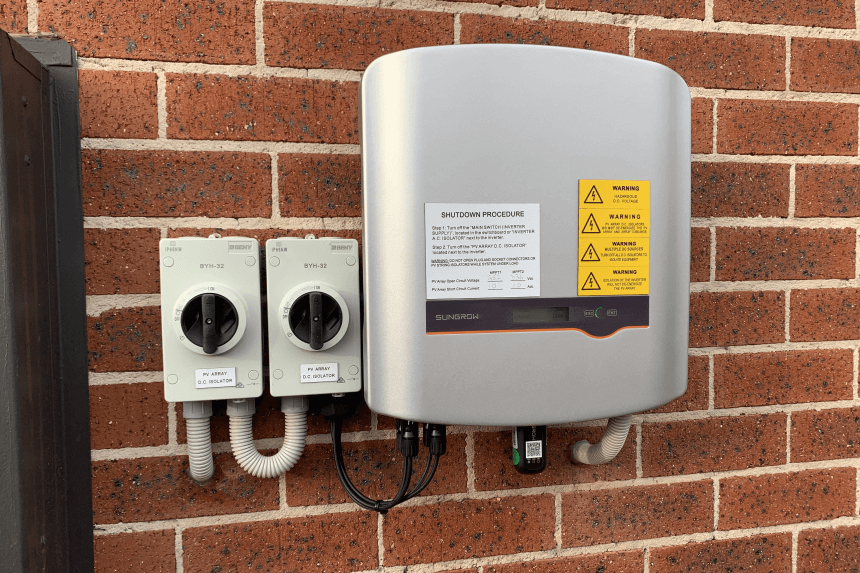
A photovoltaic inverter is used in all those situations in which we need to power a device that works with the normal home network, i.e., at 220-volt alternating current with a frequency of 50Hz.
Then the photovoltaic inverter will simply convert the current supplied by the batteries of our photovoltaic system into alternating current at 220V.
The use of a photovoltaic inverter is essential in cases where you have a direct current (12Volt-24Volt battery), and you want to power devices that go to alternating current.
There are three types of inverters:
Electric cables are not all the same; they differ in section, i.e., they have more or fewer copper wires passing through them.
Based on the number of copper wires present, you will have a more or less “large” cable.
Generally speaking, the more an electric cable has a large section, the greater the current that can pass through it, with a lower loss of energy dissipated along with it.
Appropriately sizing the electrical cables, therefore, has the advantage of increasing the efficiency of our photovoltaic and wind power system, as there will be a lower number of Watts lost along with the cables.
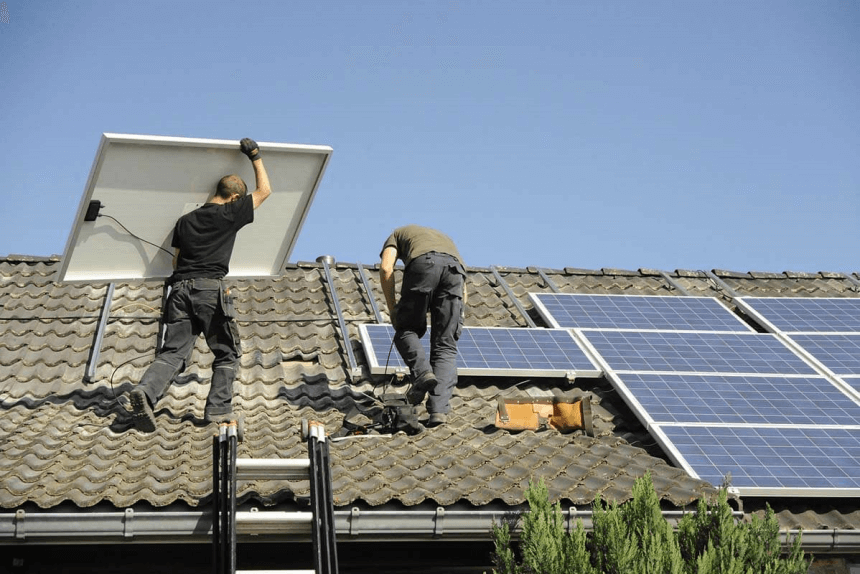
Having gotten all the equipment and installed the solar panels, all is left is to connect them and test.
For this area, the video below will show you how to connect all the components of the DIY photovoltaic system practically.
To connect the batteries in series and parallel, we first create a “series” of batteries connected in series.
Then you connect each series. Always pay attention to first connecting the negative pole of the series and only then the positive poles. As for the parallel connection, here too, it would be a good rule to connect a fuse between the various series of batteries to prevent any short-circuits of some batteries.
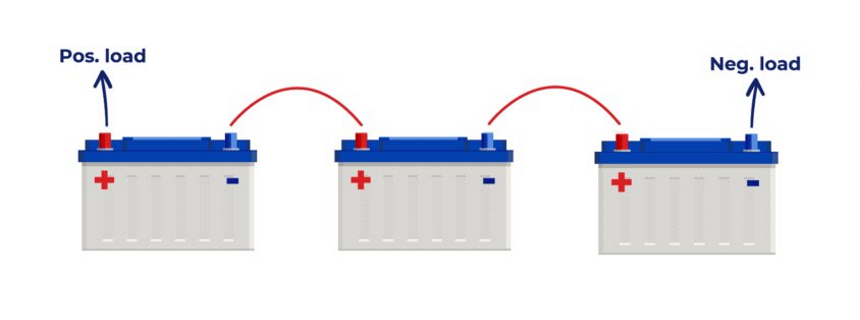
Connect in series 2 batteries from 12V to 100Ah. At the output, we will have a voltage of 24V (Volts) equal to the sum of all the individual batteries’ voltages and a total capacity identical to that of a single battery (100Ah Ampère per hour).
To connect the batteries in parallel, the same positive poles must be connected with positive and negative with negative through cables of identical length.
Warning!! We do not take any responsibility for damage caused to people or things resulting from the unproper application of this guide, nor of the related links in it.
Those who have little understanding of terms such as inverter, battery voltage, sine waves, watt-hours, direct current, etc., are likely to scratch their heads in confusion and ask how they should approach the whole thing. If you are not ready to spend days researching or leaving the work to an expert, there is a simple solution for you: solar generators.
A solar generator, also known as a power station, battery generator, or mobile energy storage device, is a fuel-less generator that is not operated with petrol or diesel but with electricity.
A solar generator is like a mobile socket or a very large power bank. Depending on the model, these generators are equipped with common connections such as USB, 12V, AC / 230V, and DC.
Perhaps the most popular and powerful solar generator is the GOAL ZERO Yeti 3000X. It’s a 2000 watts AC inverter with 3000 watts lithium battery.
Most complete solar generator kits are made up of several solar modules, which in turn contain individual solar cells. There are also various connection cables, an inverter, and a solar battery that stores the electricity produced.
For a solar generator to generate electricity, the solar modules must first be aligned towards the sun. The sunlight is now converted into electricity by solar cells. A connected inverter converts the generated direct current into alternating current to be used for various devices.
Once again, can a solar generator power a house? Well, with a photovoltaic system installed on the roof and the right solar generator and inverter installed at home, the sun’s energy can be used to generate electricity for the entire household. However, to become independent, the use of solar generators requires as much space and budget as possible, depending on your needs.